React 此文是个人学习 React 所整理的笔记,后续学习不断更新改进!
Acquaint React 官方定义 React 是一个声明式,高效且灵活的用于构建用户界面 的 JavaScript 库 。使用 React 可以将一些简短、独立的代码片段组合成复杂的 UI 界面,这些代码片段被称作“组件”。
个人理解 相比 Vue ,React *是从 * JS 角度来进行组件细分,即通过 JSX(Javascript+XML) 的形式来创建一个组件等等,反正就是 All in JS ~
他们之间更多的其他区别呢,将在后续整理完再继续总结。
摘抄 React 起源于 Facebook 的内部项目,因为该公司对市场上所有 JavaScript MVC 框架,都不满意,就决定自己写一套,用来架设 Instagram(照片交友) 的网站。做出来以后,发现这套东西很好用,就在2013年5月开源了 。 Angular1 2009 年 谷歌 MVC 不支持 组件化开发 由于 React 的设计思想极其独特 ,属于革命性创新,性能出众,代码逻辑却非常简单。所以,越来越多的人开始关注和使用,认为它可能是将来 Web 开发的主流工具。 清楚两个概念:library(库):小而巧的库,只提供了特定的API;优点就是 船小好掉头,可以很方便的从一个库切换到另外的库;但是代码几乎不会改变; Framework(框架):大而全的是框架;框架提供了一整套的解决方案;所以,如果在项目中间,想切换到另外的框架,是比较困难的; Install npx create-react-app my-app cd my-appnpm start
npx is correct~(npm 5.2+ 附带的 package 运行工具)
访问:localhost:3000,这样一个简单的React程序就创建完成!
再继续编码之前我们先来看点关键知识:
Important Knowledge Virtual DOM DOM的本质 :浏览器中的概念,用JS对象来表示 页面上的元素,并提供了操作 DOM 对象的API React中的虚拟DOM :框架中的概念,是我们用JS对象来模拟页面上的 DOM 和 DOM嵌套 为什么要实现虚拟DOM(虚拟DOM的目的): Diff *Tree diff: *
新旧两棵DOM树,逐层对比的过程;当整颗DOM逐层对比完毕,则所有需要被按需更新的元素,必然能够找到; Component diff:
在进行Tree Diff的时候,每一层中,组件级别的对比,叫做 Component Diff;
如果对比前后,组件的类型相同 ,则暂时 认为此组件不需要 被更新;
如果对比前后,组件类型不同 ,则需要移除旧组件 ,创建新组件 ,并追加到页面 上;
*Element diff: *
在进行组件对比的时候,如果两个组件类型相同,则需要进行元素级别的对比,进一步寻找一同。 React & React-dom & JSX react : 专门用于创建组件和虚拟DOM的,同时组件的生命周期都在这个包中
react-dom : 专门进行DOM操作的,最主要的应用场景,就是 ReactDOM.render()
JSX :官方文档非常详细:https://zh-hans.reactjs.org/docs/introducing-jsx.html
function formatName (user ) return user.firstName + ' ' + user.lastName; } const user = { firstName: 'Harper' , lastName: 'Perez' }; const element = ( <h1> Hello, {formatName(user)}! </h1> ); ReactDOM.render( element, document.getElementById('root') );
jsx 语法的本质: 不是直接把 jsx 渲染到页面上,而是内部将其先转换成 createElement 形式,再渲染
当 编译引擎,在编译JSX代码的时候,如果遇到了<那么就把它当作 HTML代码去编译,如果遇到了 {} 就把 花括号内部的代码当作 普通JS代码去编译;
元素渲染 :https://zh-hans.reactjs.org/docs/rendering-elements.html
CODE Example 以下是基于 webpack 工作的项目,
npm init -y
cnpm i react react-dom -S
//	以及编译需要用到的 babel 插件
cnpm i @babel/...(下面配置文件中的模块) -D

//	配置.bablelrc
{
  "presets": ["@babel/preset-env","@babel/preset-react"],
  "plugins": ["@babel/transform-runtime","@babel/plugin-proposal-class-properties"]
}
const path = require ('path' )const HtmlWebPackPlugin = require ('html-webpack-plugin' )const htmlPlugin = new HtmlWebPackPlugin({ template: path.join(__dirname,'./src/index.html' ), filename: 'index.html' }) module .exports = { mode: 'development' , entry: path.join(__dirname,'./src/main.js' ), plugins: [ htmlPlugin ], module : { rules: [ { test: /\.js|jsx$/ , use: 'babel-loader' , exclude: /node_modules/ }, { test: /\.css$/ , use: ['style-loader' , 'css-loader' ] }, { test: /\.ttf|woff|woff2|eot|svg$/ , use: ['url-loader' ] }, { test: /\.scss$/ , use: ['style-loader' , 'css-loader?modules' , 'sass-loader' ] }, ] }, resolve: { extensions: ['.js' ,'.jsx' ,'.css' , '.scss' ], alias: { '@' : path.join(__dirname,'./src' ) } } }
{ "name" : "webpacktest" , "version" : "1.0.0" , "description" : "" , "main" : "index.js" , "scripts" : { "test" : "echo \"Error: no test specified\" && exit 1" , "dev" : "webpack-dev-server --open --port 8081 --hot" }, "keywords" : [], "author" : "" , "license" : "ISC" , "devDependencies" : { "@babel/core" : "^7.8.4" , "@babel/plugin-proposal-class-properties" : "^7.8.3" , "@babel/plugin-transform-runtime" : "^7.8.3" , "@babel/preset-env" : "^7.8.4" , "@babel/preset-react" : "^7.8.3" , "babel-core" : "^6.26.3" , "babel-loader" : "^8.0.6" , "babel-plugin-transform-runtime" : "^6.23.0" , "css-loader" : "^3.4.2" , "file-loader" : "^5.0.2" , "node-sass" : "^4.13.1" , "sass-loader" : "^8.0.2" , "style-loader" : "^1.1.3" , "url-loader" : "^3.0.0" , "webpack" : "^4.41.5" , "webpack-cli" : "^3.3.10" , "webpack-dev-server" : "^3.10.3" }, "dependencies" : { "@babel/runtime" : "^7.8.4" , "bootstrap" : "^4.4.1" , "react" : "^16.12.0" , "react-dom" : "^16.12.0" } }
import React from 'react' ; import ReactDom from 'react-dom' import bootcss from 'bootstrap/dist/css/bootstrap' import Hello from './components/Hello.jsx' import Hellot from '@/components/Hello.jsx' import Helloignore from '@/components/Hello' import cssStyle from '@/css/main' const myH = React.createElement('h5' , null , 'This is h5 tag~' )const myH = React.createElement('h5' , {id : 'myH' }, 'This is h5 tag~' )ReactDom.render(myH,document .getElementById('app' )) let str = 'hello tadm~' const myDiv = <div > This is a div --- {str}</div > ReactDom.render(myDiv, document .getElementById('app' )) let frames = ['Vue' ,'React' ,'Angular' ]function Hello ( return <div > This is Hello component</div > } function Hello (props ) props.name = 'change' return <div > This is Hello component --- {props.id} --- {props.name} --- {props.age}</div > } const obj = { id: 0 , name: 'Tadm' , age: 19 , code: 'react' } const newObj = { id: 1 , ...obj, id: 2 } const styles = { hStyle: { color: 'orange' , fontWeight : 500 } } class Mycomponent extends React .Component constructor () { super () this .state = { msg: 'Hello Tadm' } } render() { return <div style ={{ border: 'dashed 1px '}}> {/* 直接使用 props 和单独 JSX 文件有所区别,但是 props 都是只读的 */} This is mycomponent --- {this.props.name} --- {this.props.age} {/* this.state.* '*' is able to read and write */} {/* <h4 style ={styles.hStyle} > { this.state.msg }</h4 > */} <h4 className ={[cssStyle.hStyle, 'gSty '].join (' ')}> { this.state.msg }</h4 > <button className ="btn btn-info" onClick ={ () => this.doSth() }>button</button > <br /> {/* <input type ="text" className ={cssStyle.input} value ={this.state.msg} readOnly > </input > */} <input type="text" className={cssStyle.input} value={this.state.msg} ref="changeM" onChange={ () => this.changeMsg() }></input > </div > } doSth = () => this .setState({ msg: 'hello Sate~' }, function ( console .log(this .state.msg); }) } changeMsg = () => let newValue = this .refs.changeM.value this .setState({ msg: newValue }) } } ReactDom.render(<div > <p title ="str" > This is a p tag~</p > <div > {str}</div > {/* {frames} */} {/* <Hello name ={obj.name} age ={obj.age} > </Hello > <Hello {...obj }> </Hello > */} {/* <p > This is newObj {newObj}</p > 不能直接输出对象 */} {/* <Hello {...newObj }> </Hello > <Hellot {...obj }> </Hellot > <Helloignore {...obj }> </Helloignore > */} {frames.map(item => <div key ="item" className ="frames" > <h4 > {item}</h4 > </div > )} <Mycomponent {...obj }> </Mycomponent > </div > document .getElementById('app' ))
import React from 'react' ; import ReactDom from 'react-dom' export default function Hello (props ) return <div > This is Hello component --- {props.id} --- {props.name} --- {props.age}</div > }
当然以上算是一个小小入门,接下来继续~
在 Chrome 或者 Firefox 中安装扩展 React Devtools 可以让你在浏览器开发者工具中查看 React 的组件树。
安装 React DevTools 之后,按下F12进入开发者界面,此时工具栏最后会多展示一个 React 的选项卡(包含 “⚛️ Components” 和 “⚛️ Profiler”)。你可以使用 “⚛️ Components” 来检查组件树。
类似于我们开发 Vue 时用到的 Vue Devtools~
Component 官方 :https://zh-hans.reactjs.org/docs/components-and-props.html
组件化思想在现代web开发中用的非常多了已经,比如在 vue 中我们就通常将某个页面,某个功能等抽象为一个单独的组件并通过插槽等手段提高组件的复用性……接下来就简单介绍一下 react 的组件操作
Create(Two ways) Function 方式 此方式建的组件为无状态组件 (无 state 和 生命周期函数)
function Hello ( return <div > Hello 组件</div > }
const obj = { id: 0 , name: 'Tadm' , age: 19 , code: 'react' } <Hello {...obj}></Hello> / / 在构造函数中,使用 props 形参,接收外界 传递过来的数据 function Hello(props) { / / props.name = 'zs' console.log(props) / / 结论:不论是 Vue 还是 React,组件中的 props 永远都是只读的;不能被重新赋值; return <div>这是 Hello 组件 --- {props.name} --- {props.age} --- {props.gender}</ div>}
Class 方式 此方式创建的组件为有状态组件 (包含独立的 state 和 生命周期函数)
class 组件名称 extends React .Component constructor () { super () this .state = { msg: 'Hello Tadm' } } render(){ return <div > 这是 class 创建的组件</div > } }
适用性(摘抄) 如果一个组件需要有自己的私有数据 ,则推荐使用:class创建的有状态组件 ; 如果一个组件不需要有私有的数据 ,则推荐使用:无状态组件 ; React官方说:无状态组件 ,由于没有自己的state和生命周期函数,所以运行效率 会比 有状态组件稍微高一些 ; 组件中的 props 和 state/data 之间的区别
props 中的数据都是外界传递 过来的; state/data 中的数据,都是组件私有 的;(通过 Ajax 获取回来的数据,一般都是私有数据); props 中的数据都是只读的 ;不能重新赋值; state/data 中的数据,都是可读可写 的; State 在 React 中,state 中的数据相当于是单向流动的 ,只能从组件到页面 ,和响应式的 Vue 有所差距,那么我们如果要修改自然也有法子,不然 React 怎么还会成为一个优秀的框架呢?
一般是我们主动去察觉到变化(即知道对应位置数据需要更新),添加一些方法去更新state中的数据:
render(){ <input type="text" className={cssStyle.input} value={this .state.msg} ref="changeM" onChange={ () => this .changeMsg() }></input> } changeMsg = () => { / / console.log(e.target.value); let newValue = this.refs.changeM.value / / 拿到改变后的值更新到 State / / 更新是通过 this.setState 来进行,和 vue 中直接赋值有所差距(this.state.* = *) this.setState({ msg: newValue }) }
这样当我们更改 input 中的内容时则可以更新组件 state 中的数据并返回到页面上实现数据更新
细节:官方也推荐我们使用箭头函数 来定义或者调用相应事件
Code & Example class Clock extends React .Component constructor (props) { super (props); this .state = {date : new Date ()}; } render() { return ( <div> <h1>Hello, world!</h1> <h2>It is {this.state.date.toLocaleTimeString()}.</ h2> </div> ); } } ReactDOM.render( <Clock / >, document .getElementById('root' ) );
Life 官方 :https://zh-hans.reactjs.org/docs/state-and-lifecycle.html
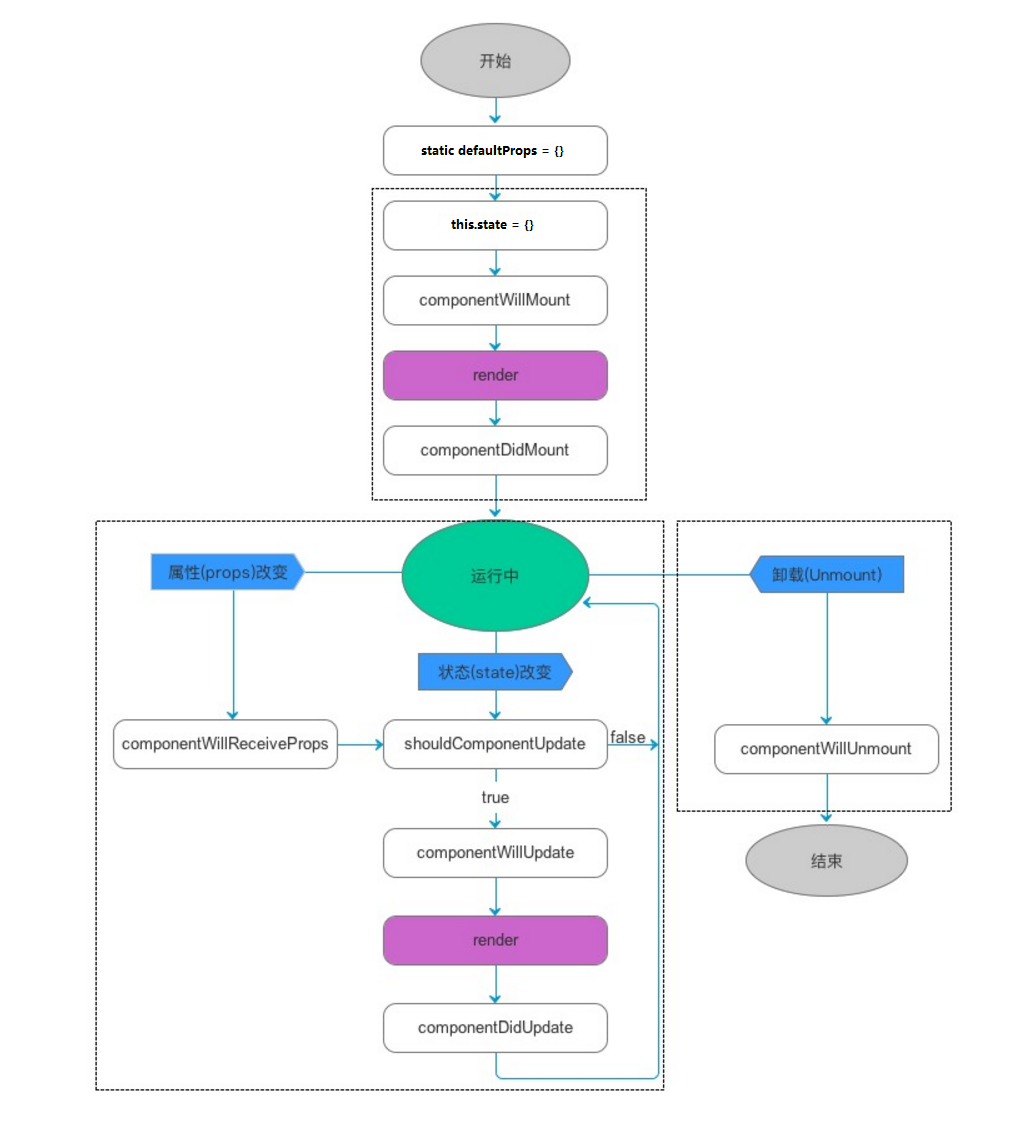
Examplanation React组件生命周期分为三部分 :
componentWillMount:
在组件创建,并初始化了状态之后,渲染前调用,可以在这里做一些业务初始化操作 render:
componentDidMount:
在第一次渲染后调用,只在客户端。之后组件已经生成了对应的DOM结构,可以通过this.getDOMNode()来进行访问。 如果你想和其他JavaScript框架一起使用,可以在这个方法中调用setTimeout, setInterval或者发送AJAX请求等操作(防止异步操作阻塞UI)。 组件运行阶段 :按需,根据 props 属性 或 state 状态的改变,有选择性的 执行 0 到多次componentWillReceiveProps:
在组件接收到一个新的 prop (更新后)时被调用,在初始化render时不会被调用。 shouldComponentUpdate:
返回一个布尔值。在组件接收到新的props或者state时被调用。在初始化时或者使用forceUpdate时不被调用 可以在你确认不需要更新组件时使用 componentWillUpdate:
在组件接收到新的props或者state但还没有render时被调用。在初始化时不会被调用 render:
componentDidUpdate:
componentWillUnmount:
可以类比 Vue 的生命周期来进行理解(created/mounted/updated/destroyed)
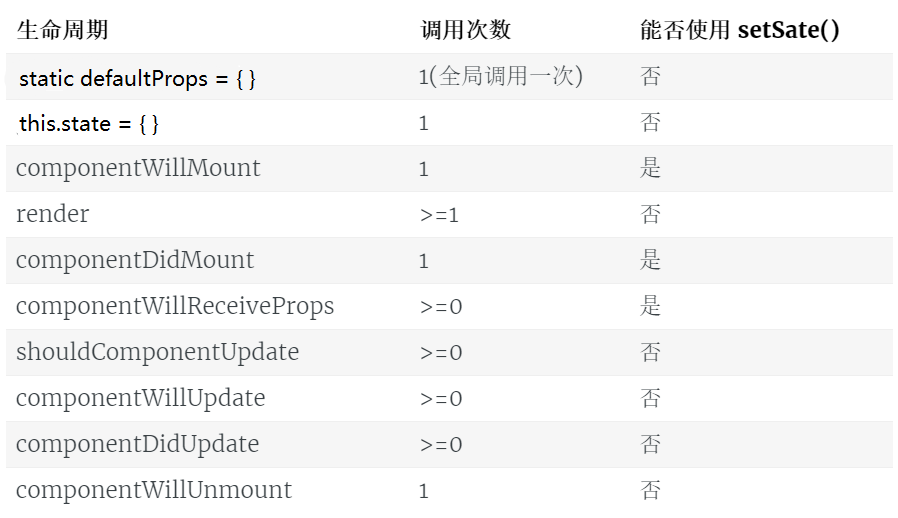
参考下图:
defaultProps 在组件创建之前,会先初始化默认的props属性,这是全局调用一次,严格地来说,这不是组件的生命周期的一部分。在组件被创建并加载候,首先调用 constructor 构造器中的 this.state = {},来初始化组件的状态。
CODE & Example class Clock extends React .Component constructor (props) { super (props); this .state = {date : new Date ()}; } componentDidMount() { this .timerID = setInterval( () => this .tick(), 1000 ); } componentWillUnmount() { clearInterval(this .timerID); } tick() { this .setState({ date: new Date () }); } render() { return ( <div> <h1>Hello, world!</h1> <h2>It is {this.state.date.toLocaleTimeString()}.</ h2> </div> ); } } / / 渲染组件到 root ReactDOM.render( <Clock / >, document .getElementById('root' ) );
详细过程分析:
当 <Clock /> 被传给 ReactDOM.render()的时候,React 调用 Clock 组件的构造函数。因为 Clock 需要显示当前的时间,所以它会用一个包含当前时间的对象来初始化 this.state。我们会在之后更新 state。 之后 React 会调用组件的 render() 方法。这就是 React 确定该在页面上展示什么的方式。然后 React 更新 DOM 来匹配 Clock 渲染的输出。 当 Clock 的输出被插入到 DOM 中后,React 就会调用 ComponentDidMount() 生命周期方法。在这个方法中,Clock 组件向浏览器请求设置一个计时器来每秒调用一次组件的 tick() 方法。 浏览器每秒都会调用一次 tick() 方法。 在这方法之中,Clock 组件会通过调用 setState() 来计划进行一次 UI 更新。得益于 setState() 的调用,React 能够知道 state 已经改变了,然后会重新调用 render() 方法来确定页面上该显示什么。这一次,render() 方法中的 this.state.date 就不一样了,如此以来就会渲染输出更新过的时间。React 也会相应的更新 DOM。 一旦 Clock 组件从 DOM 中被移除,React 就会调用 componentWillUnmount() 生命周期方法,这样计时器就停止了。 注意 :
因为组件state的更新是异步操作,这样我们的某些操作就会被影响,那么如何解决呢:
this .setState({ counter: this .state.counter + this .props.increment, }); this .setState((state, props ) => ({ counter: state.counter + props.increment }));
到这里其实我们已经能够体会到 React 的整个简单过程,不得不说确实很优秀~
事件处理 官方(较全): https://zh-hans.reactjs.org/docs/handling-events.html


